torsdag den 18. marts 2021

Bygge en ekstern skærm, fra Bærbar skærm

 Er ret spændt på mit nye projekt.

Har en bærbar Lenovo bærbar liggende, men den har ram, som er loddet fast. Desværre er der en fejl på en af ram-klodserne, og siden at jeg ikke kan lodde dem af, tænkte jeg, at genbruge hvad jeg kunne. Heriblandt skærmen, Skærmen er en 14" touch skærm, 

Så efter at have set videoen:
https://www.youtube.com/watch?v=DrqdHVeBkp4&t=176s

Så har bestilt en controller board, fra Ebay, men det var ret svært at finde et til min model.
Har dog bestilt et nu, 


Efter at have indtastet:
LP140QH1 Controller board

Fandt godt nok en der hed:
LP140QH1-SPB1,
Men inde under beskrivelsen, har jeg fundet ud af at den også understøtter LP140QH1-SPA2.
Så har prøvet at bestille den og så må jeg se om en måned, når det står til at ankomme.


More to come

onsdag den 10. februar 2021

Bærbare connector stik


Bærbar skærmstik / Screen connector

There are several different types of video connectors used in laptops screens. For the most part the connectors are not interchangeable. Here are the most common types of video connectors that are in use today:

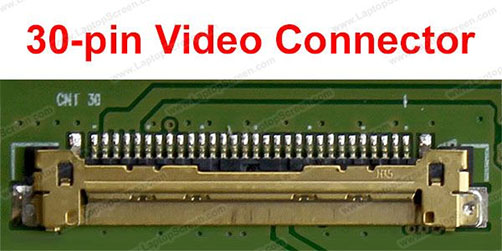
30-pin eDP - the main modern connector.
It is used on screens with resolutions up to 1920 x 1080. If your laptop was manufactured after 2014 and features screen resolution up to 1080p it is likely using this type of connector.


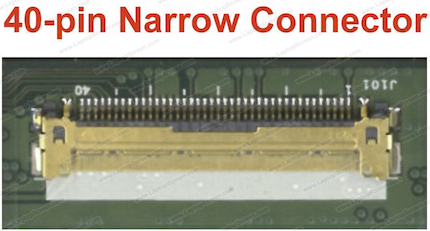
40-pin Narrow Connector
40-pin touch interface and eDP video connector used on some Lenovo laptops starting from 2020.

Narrow 40pin - pitch 0.4mm (found in Lenovo OnCell touch)
Regular 40pin - pitch 0.5mm

40-pin same physical connector standard but 3 different and incompatible signals

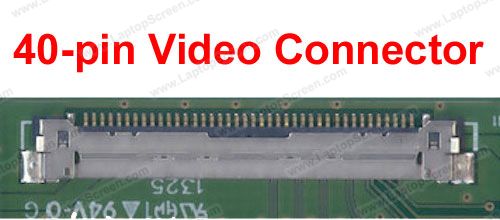
40-pin eDP Touch - used on newer laptops after 2015, the additional pins over the 30-pin eDP connector are needed for a built-in (on-cell) touchscreen functionality.

40-pin eDP QHD+ - used on newer laptops after 2015, the additional pins over the 30-pin eDP connector are needed for higher resolution options such as QHD (2560 x 1440) and even higher (4 channel eDP).

"40-pin eDP Touch" LCDs are not interchangeable with "40-pin eDP QHD+" screens. Even though the connectors are the same, plugging a "40-pin eDP Touch" LCD in-place of a "40-pin eDP QHD+" screen will not provide the touch functionality, and vice-versa, plugging a QHD screen in place of a 40-pin touchscreen will not provide higher resolution.


40-pin LVDS (old)

Used on most LED back-lit laptops prior to 2014. It was the most common standard at the time and allowed resolutions up to 1920 x 1080p.
Screens fitted with 40-pin LVDS connector are not interchangeable with screens fitted with 40-pin eDP because of the two different signalling technologies, even-though the connectors follow identical physical standards.


Other

120Hz+ LVDS (gaming) screens used a 50-pin connector
CCFL screens (obsolete) used 20-pin LVDS and 30-pin LVDS connectors.
MacBooks use their own proprietary LVDS and eDP connector types.

fredag den 22. januar 2021

Linux Mint 20, installations problemer

 Har haft nogle problemer med at installere programmer, som jeg gjorde før, da jeg kørte tidligere version af Linux mint.


Nogle ændringer der har skulle laves, har været:

Tidligere skrev man APT GET.
Nu skal man nøjes med APT, da APT komandoen er blevet udvidet.

Så f.eks da jeg ville installere Synapse, skulle jeg skrive

sudo apt install synapse    
i terninalen


tirsdag den 4. februar 2020

Glemt password i Rasbian

Jeg glemte koden til min Rasbian installation på min Raspberry pi 3,

Efter nogen tid på nettet. 
Var løsningen at åbne terminalen,
Og skrive 

sudo passwd

Hvilket gav mig muligheden for at oprette mit nye password.

tirsdag den 29. januar 2019

Partitions problemer

Partitions problemer


Jeg løb ind i flere problemer, med både USB nøgler, og SD kort, hvor Partitionerne var ikke til at rette op, med de standard programmer, i windows.

Men var heldigvis så heldig, at falde over en engelsk beskrivelse, der beskriver, hvordan man kan ændre sine nøgler eller SD kort tilbage.

eks fra nettet.

Jeg løb ind i disse problemer, da den ene af mine USB nøgler, bruges til at boote, flere forskellige Operativ Systemer, fra samme menu, (YUMI)
(https://www.pendrivelinux.com/yumi-multiboot-usb-creator/)
Hvor jeg fra samme menu, kan boote, Windows 7, Windows 10, og flere forskellige Linux distro's.
Men dette gør bla. at partitionerne, på usb nøglen, bliver ændret, og kræver nogle gange, at jeg er nød til at gå den tur igennem, som er beskrevet neden under.
Løber også ind i det samme problem, når jeg har lagt nyt Operativ System (OS), på min Raspberry PI 3, Så hvis jeg ønsker at formatere SD kortet, for at lægge nyt OS på, skal jeg ofte også gå denne vej igennem, da standard partitions programmet i bla windows, ikke er i stand til at slette partitionerne, så der kan blive en stor partition, som var før/ved køb af SD kortet.
(Kunne blve spændende at lave det som en .bat fil en dag.)

Beskrivelse:
----------------------------------------------------------------------------------------------------------

Start a command prompt, and start the DISKPART console. 
List all of your disks by typing LIST DISK, 
then select the proper disk with SELECT DISK # (where # is obviously the SD card). 
You can then type CLEAN (MAKE SURE YOU SELECTED THE PROPER DISK!), and it will clear the partition table on the card.

To create a primary partition to reuse the space on the card, type CREATE PARTITION PRIMARY. 
This will then reallocate the previously "cleaned" space.

To format, type FORMAT FS=FAT32 QUICK, and finally, to reassign a drive letter, type ASSIGN.

If you're unable to determine the proper disk, remove the SD card, run DISKPART and LIST DISK, 
and then re-run it with the SD card inserted. The SD card is just the disk that has been added.

FDISK / CFDISK (Linux/Mac)

In a terminal, start fdisk /dev/sdx where /dev/sdx is your SD card device 
(may depend on the Linux distro you're using, see below). 
You can then delete all existing partitions on the device by typing d, and then adding a single new partition & format it. 
You an also just type n to create a new partition table, and start laying everything out.

cfdisk is also another viable tool, which is basically fdisk with a greatly improved user interface. 
In both cases, once the drive is formatted, you will lastly need to mount it.

If you're unable to determine the proper device, remove the SD card, run fdisk -l, 
and then re-run it with the SD card inserted. The SD card is just the device that has been added.
-----------------------------------------------------------------------------------------------------------------------


Partition Problems

I Sometimes run into partition problems, with either my USB Drive, or my SD card.
But when i try to delete the partitions using the System Management program, i prompts with a error, saying, it can't delete the partitions.


After using (YUMI)
(https://www.pendrivelinux.com/yumi-multiboot-usb-creator/)
on my usb key, for booting into multible Operating Systems (OS), from the same USB key, it partitions my USB key, to be able to do this.
Also, when i have installed a OS on my Raspberry PI 3, and want to install a different OS, it again will not allow to delete the partitions, so I can work, with only one Partition.

So I found, that a nice person, has sovled the problem for me, somewhere on the internet, and would like to share the solution.

------------------------------------------------------------------------------------------------------------------------------
Start a command prompt, and start the DISKPART console. 
List all of your disks by typing LIST DISK, 
then select the proper disk with SELECT DISK # (where # is obviously the SD card). 
You can then type CLEAN (MAKE SURE YOU SELECTED THE PROPER DISK!), and it will clear the partition table on the card.

To create a primary partition to reuse the space on the card, type CREATE PARTITION PRIMARY. 
This will then reallocate the previously "cleaned" space.

To format, type FORMAT FS=FAT32 QUICK, and finally, to reassign a drive letter, type ASSIGN.

If you're unable to determine the proper disk, remove the SD card, run DISKPART and LIST DISK, 
and then re-run it with the SD card inserted. The SD card is just the disk that has been added.

FDISK / CFDISK (Linux/Mac)

In a terminal, start fdisk /dev/sdx where /dev/sdx is your SD card device 
(may depend on the Linux distro you're using, see below). 
You can then delete all existing partitions on the device by typing d, and then adding a single new partition & format it. 
You an also just type n to create a new partition table, and start laying everything out.

cfdisk is also another viable tool, which is basically fdisk with a greatly improved user interface. 
In both cases, once the drive is formatted, you will lastly need to mount it.

If you're unable to determine the proper device, remove the SD card, run fdisk -l, 
and then re-run it with the SD card inserted. The SD card is just the device that has been added.
-----------------------------------------------------------------------------------------------------------------------
fredag den 28. juli 2017

Bærbar skærm til "rigtig" skærm

Bærbar skærm til ekstern skærm


Jeg blev temmelig inspireret af videoen fra Youtube, om at lave en bærbar skærm, om til en statisk skærm.

Jeg har gennem tiden, repareret en del computere gennem tiden, men nogle gange er bundkortet brændt af, og istedet for at smide bærbaren ud, har jeg fået computeren/ene.

Så tænker at jeg skal have testet, om jeg også kan lave sådan en skærm.
Kan se at videoen er lavet til USA/UK, så skal have lavet mig en dansk version af denne.

Igennem filmen, er der skrevet nogle krav til at bygge skærmen.
1) Noget folie, med Carbon lign udseende.
 2) Et kontroller board, for at kunne ændre stikket, som normalt går ned til bundkortet på bærbaren, skal kunne converteres, til forskellige typer stik indgange, VGA, DVI, HDMI eller lign.
Tror at jeg vil prøve at bestille fra Ebay, da de også levere til danmark, skal dog være obs på, at ebay har forskellige domains, og kun nogle af dem levere til Danmark, så skal lige have det med, når der bestilles.
Fra skab
Fra den største af skærmene. LP173WD1


Det ser ud som om, at den kan købes her:


mandag den 8. maj 2017

ISO's, download og installation

Jeg har med tiden eksperimenteret er del med forskellige linux distributioner, Mint, Ubuntu, Suse, Puppy og flere.

Er løbet ind i et par spg undervejs.
F. Eksempelvis Chrome OS, hvor man henter det.
Faldt over en YouTube-video der fortalte hvor man bla kunne downloade fra.
Dog fandt jeg ud af at den faktisk hedder Chromium OS, da det er et Open Source projekt.
Fandt ud af at det findes i mange stilarter og versioner på:

https://chromium.arnoldthebat.co.uk/index.php?dir=special/

Hvor der er forklaring til hvordan og lign.
Alle isoerne er zippet, så de skal lige pakkes ud inden de kan mountes eller brændes.

--------------------------------------------------------

Puppy Linux

Har prøvet Puppy Linux et par gange, og er stærkt imponeret, da det bliver pakket ud i rammene, og derfor når det køre, er lyn hurtigt, da ram er langt hurtigere end ssd harddiske.
Skal klar finde en distro der passer mig, de findes bla på distrowatch.com